¶ Training
¶ Training Divisions
Training in Legacy has 3 consecutive levels:
- Groundwork
- Undersaddle or Basic Driving
- Discipline- or Job-specific training
¶ Groundwork
Groundwork is the foundation for everything, and needs to be completed before you try to start Undersaddle or Basic Driving work. This training can be done at any age, however horses under 2 years old can only do Groundwork training!
¶ Undersaddle
Undersaddle work represents basic riding training to prepare your horse for discipline-specific training. For English disciplines, you will only need to complete through ‘Transitions’ training to have a fully green broke horse ready to start discipline work. For Western disciplines, you will also want to train to Neck Rein! If you are training for a job, many jobs will also require you to complete Undersaddle training, though see the Jobs page for more details.
¶ Basic Driving
Basic Driving training is similar to Undersaddle, however it is the basic training needed for pulling weight, including a carriage or cart! You will need to train Basic Driving if you want to do Trot Racing, Pace Racing, Pulling or Marathon Driving, or the Carriage or Logging jobs.
¶ Discipline-specific Training
Once your horse has completed Undersaddle or Basic Driving, they can move on to specialized discipline training. With the exception of miniature horses, any horse can be trained in any discipline, and even more than one discipline.
¶ Job-specific Training
Again, once your horse has completed Undersaddle or Basic Driving training, they will be able to move to Job-specific Training. With the exception of miniature horses again, any horse can be trained for any job, and even more than one job.
¶ A Note About Training Miniature Breeds
Miniature breeds in Legacy cannot be ridden, so you cannot train them Undersaddle, or for any discipline or job that involves riding. But, they can be trained to pull a cart though! So, you can only train Minis in Groundwork, Basic Driving, In-hand Jumping, Trot Racing, Pace Racing, Pulling or Marathon Driving disciplines, or Carriage, Film Actor or Circus jobs.
¶ Quick Guide to Training
The basics of training are, you will select a ‘Discipline’ (in this case, any division of training), then a specific Task within that discipline. Then you will adjust three sliders that describe how you will train the horse, and finally you click ‘TRAIN’ to actually train them. A training message will then pop up indicating how your horse did, and that's the basics! Let's break things down a bit more though.
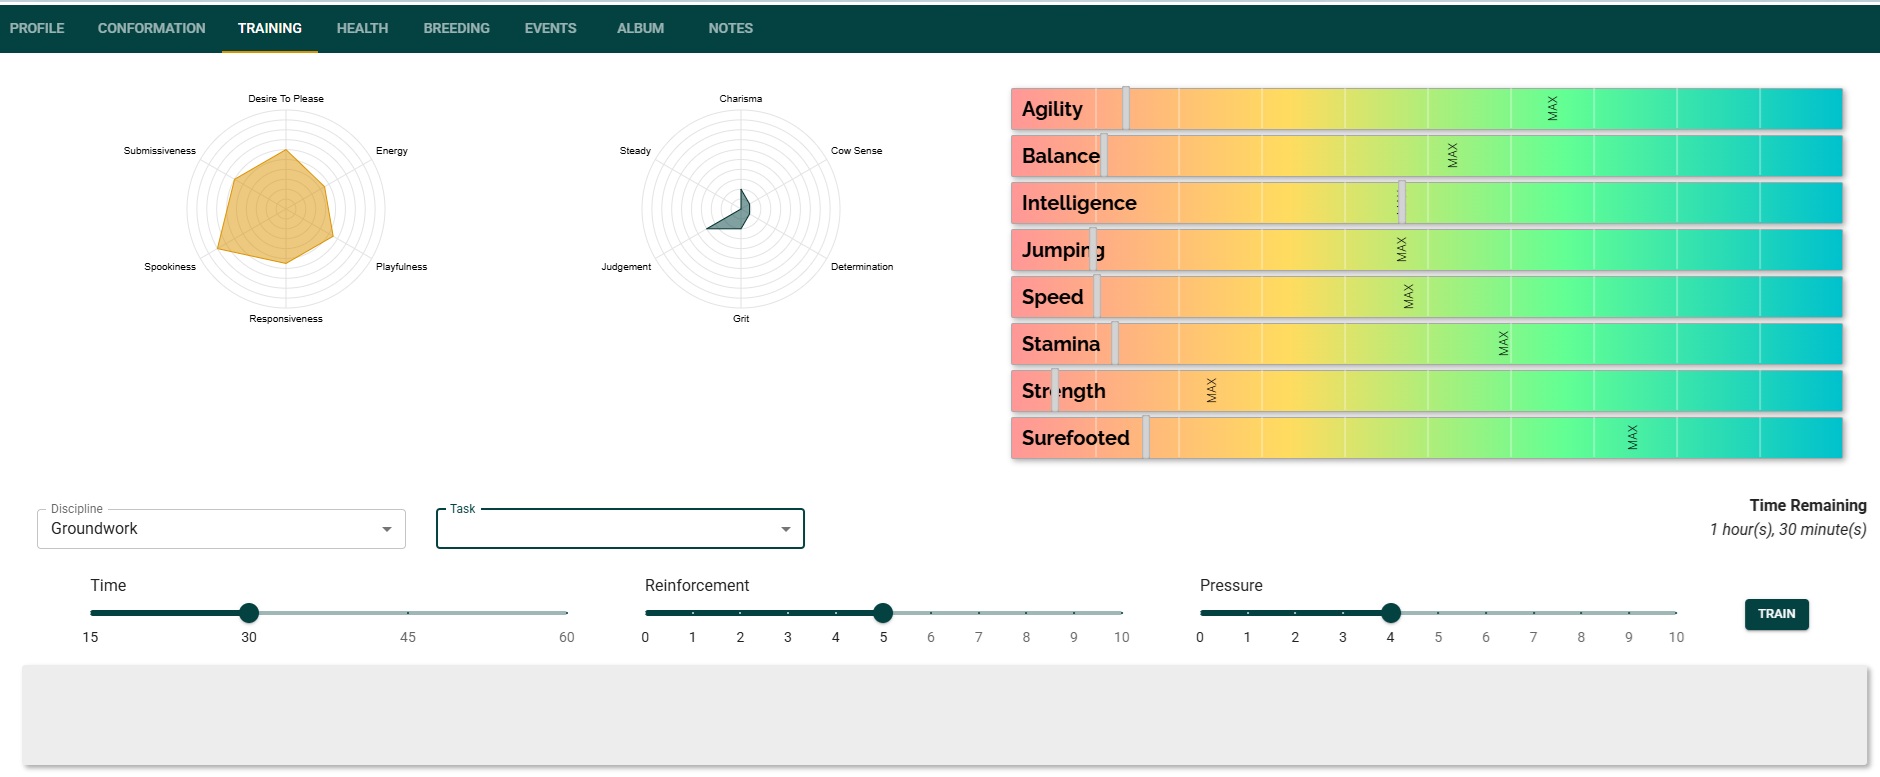
¶ Horse Personality and Performance Abilities
Just like on their Profile tab, you will see your horse's personality, talents, and performance abilities on their Training tab. Personality is shown to help you figure out your ‘Training Style’, while Talents and Performance Abilities are shown to help you decide what training you may want to do. You can also ‘see’ your horse's current Performance Abilities (the gray bars) increase as you train!
¶ Time Remaining
Each horse can handle a specific amount of training every two weeks (each rollover) in the game. As you train, this number will go down until it reaches 0 minute(s) remaining, in which case you will have to stop training and wait until the next rollover to advance time. How much training time a horse can handle is genetic, but also depends heavily on their stamina, which will increase with training. So, you will see a horse's time remaining increase as they become more fit!
Remember though, rollover happens every 12 real hours, so you can train your horses 2X a day!
What happens if you don't use up their time? If you don't have an ‘Auto-trainer’ hired, then nothing! The time will be unused and will reset to the full time next rollover. However, if you have an Auto-trainer hired and your horse still has training to do, then the Auto-trainer will use up the rest of the time. See below for more information on Auto-trainers.
¶ Time, Reinforcement and Pressure Sliders
This section is where you will decide your ‘Training Style’ for your horse. Horses all have different personalities and preferences, so you will need to adjust how you train for every horse! Don't worry though, once you set your Training Style, the game will remember it for you, so you won't have to write it down or redo it every day.
One more thing before we move on, Training Style is very important for helping your horse learn. If your Style is too different from what your horse likes, they will become frustrated and not learn as much from each training session. So be sure to adjust your Style as needed.
¶ Time
This is how long you will train the horse for in a single training session. You have options of 15, 30, 45 or 60 minute sessions. Each horse will have a preference for this! In fact, how long of sessions they like will depend on their Energy and Playfulness personality traits. A more energetic horse will like longer sessions, while a more playful horse won't have a long attention span, and will need less time.
¶ Reinforcement
This is how much positive reinforcement you will give the horse in the training sessions, with 0 being no positive reinforcement, and 10 being a lot. How much positive reinforcement your horse will need will depend on their Submissiveness and Desire to Please. High Submissiveness or Desire to Please horses will like a lot of positive reinforcement, while a horse low for either will like less.
¶ Pressure
This is how much ‘pressure’ you will use when teaching the horse. This isn't necessarily how hard you are ‘squeezing’ the horse, but also includes how assertive you are being in general when training the horse. How much Pressure a horse prefers is determined by their Spookiness and Responsiveness. A very Spooky or Responsive horse will only need a little pressure, while a bombproof (not spooky) or low Responsiveness horse will need a lot of Pressure.
¶ Figuring Out What Training Style To Use
Every time you click train, you will be given text feedback on how your horse did. The feedback can be broken down into sections to help you figure out if you need to adjust your Training Style. Let's look at one example:

Here I did a 30 minute Barrel Racing Walk Pattern training session, with 7 Reinforcement and 9 Pressure (so a lot of reinforcement and pressure). The response was:
“Mare #3 huffed and puffed at the barrel from afar, and flicked their tail in irritation when you applied pressure. They seemed uncertain of what was the right or wrong thing to do. By the end, Mare #3 was quite content with how much they did and learned."
Let's break it down:
“Mare #3 huffed and puffed at the barrel from afar"
This section tells you how your horse did when attempting the training task. In this case, she was too afraid of the barrels to approach. Not surprising, she just started her Barrel Racing training, as you can see by the progress bar for ‘Walk Pattern’ underneath the training response.
“flicked their tail in irritation when you applied pressure.”
This indicates how happy our horse was with how much Pressure we used. In this case, our horse was irritated. So, you would want to adjust your Pressure next session if you get this response (or similar).
“They seemed uncertain of what was the right or wrong thing to do.”
This indicates how well the horse is figuring things out based on your cues, which they would learn from how much Reinforcement you are giving them. In this case, our horse is confused, so we will need to adjust our Reinforcement next session as well.
“By the end, Mare #3 was quite content with how much they did and learned.”
This last section tells you about how the session ended, which indicates how well the horse liked the Time of the session. In this case, our horse is happy! So we don't need to adjust the Time next session. But, if you got a message saying the horse seemed to want to do more, or that they were too tired, then you would need to adjust Time.
Now, next session you would just adjust the appropriate sliders, and then click train again. Once you get the response you want, they you can stop adjusting your sliders, and just click train! The progress bar for whatever you are training will increase as you go, until it reaches 100%. There are also orange markers on the bars to mark 50 and 75% trained.
¶ A few more Training Style notes
- Each horse usually has more than one preference on each slider, so don't worry too much about getting them perfect!
- Not every horse has a ‘perfect’ Training Style. Just like in real life, some horses are quirky! Imagine a horse who is Spooky, but has low Responsiveness. Because they are spooky, you won't want to use much pressure, but because they aren't responsive, you will need more to get them to listen! In these cases in game, you will just always get a slightly odd training response.
- Didn't we say that Training Style affects how much a horse learns though? This is true, though don't worry, the difference in how much they do or don't learn is usually small. Just another incentive to be careful of what you breed for!
¶ How quickly do horses learn?
There are three things which affect how quickly a horse learns. The first we have already mentioned, and that's your Training Style. The other two are Trainability and Aptitude.
¶ Trainability
Trainability is a hidden trait that is determined by the horse's personality traits and intelligence. To get a more trainable horse, you will want:
- High Submissiveness
- Low Playfulness
- Low Spookiness
- High Desire to Please
- High Intelligence
Breeding for better trainability is crucial if you want to win Futurities or Breeder's Cups!
¶ Aptitude
The previous two things mentioned affect all training equally, however, sometimes horses struggle with some specific tasks while excelling at others! For example, a very spooky horse is going to struggle going over new Cross Country jumps, while a horse with great Balance will learn to collect their trot faster. Which stats affect which training tasks is very complicated, so we won't bore you with the details. Just know that training per task can vary, and putting a horse in training for something they are not suited for will slow them down a bit! Don't worry though, they will still finish.
¶ Manual vs. ‘Auto-trainers’
You have two options to train your horses in Legacy: 1) do it manually, or 2) use an ‘auto-trainer’.
To manually train, just do what is described above. If you'd prefer to have training be done automatically though, scroll to the bottom of the Training tab, under Hired Help, and click the toggle switch next to whatever you want your horse trained in, and that's it! The hired trainers will use whatever training time your horse has left at rollover, and you will be given a training report in the Training Log, to let you know how your horse did.
Just like you, the Auto-trainers will have to figure out a good Training Style for your horse, which you will see in their training log. They usually figure it out pretty quick, and they will also tell you a good style to use by setting the sliders for you!
¶ Pros and Cons
Why choose one over the other? Well, some of it comes down to preference, but there are some pros and cons of each.
¶ Manual
| Pros | Cons |
| Free. | Time-consuming for the player. |
| You can more closely tailor your horse's training to exactly what you need. | If you forget, you lose sessions and your horse doesn't get trained. |
¶ Auto-trainers
| Pros | Cons |
| Training is done automatically for you. You do not have to log in for auto-trainers to train. This means you can go on vacation and your horses will still get trained. | Cost game money. |
| They train in a specific order, which means you don't need to know the specific prerequisites for each task. Auto-trainers know it all! | |
| You can toggle on more than one auto-trainer, and they will automatically know which things should be trained first. |
Which option is ‘best’ is really up to you. You don't even have to pick just one though! You can manually train a horse as much as you want, then, if you have to go, just switch on the autotrainer and let them use the rest of your sessions at rollover! Although you should keep in mind that the auto-trainers will still charge full price…
¶ Pricing
| Cost/Rollover | Cost/Game Month | |
| Auto-Trainer |
$750 |
$1,500 |
¶ Training Prerequisites
Some training can not be completed without first having other training at least started or sometimes completed. The game mostly helps you out with this by graying out any training tasks your horse has not met the prerequisites for.
Want to know the specifics? You can use this table as a guide:
| Discipline | Task | PreReq 1 | PreReq 2 | PreReq 3 | PreRe 4 |
| Groundwork | Halter | Desensitize | |||
| Groundwork | Lead | Halter | |||
| Groundwork | Stand | Lead | |||
| Basic Driving | Introduce Harness | Desensitize | |||
| Basic Driving | Introduce Basic Cues | Introduce Harness | |||
| Basic Driving | Ground Drive in Harness | Introduce Basic Cues | |||
| Basic Driving | Practice Pulling Tire | Ground Drive in Harness | |||
| Undersaddle | Tack | Stand | |||
| Undersaddle | Ground Drive | Tack | |||
| Undersaddle | Walk Out | Ground Drive | |||
| Undersaddle | Trot | Walk Out | |||
| Undersaddle | Canter | Trot | |||
| Undersaddle | Stop | Walk Out | |||
| Undersaddle | Back Up | Stop | |||
| Undersaddle | Leg Yield | Walk Out | |||
| Undersaddle | TurnRight | Leg Yield | |||
| Undersaddle | TurnLeft | Leg Yield | |||
| Undersaddle | Transitions | Canter | Back Up | TurnRight | TurnLeft |
| Undersaddle | Neck Rein | TurnRight | TurnLeft | ||
| Barrel Racing | Walk Pattern | Transitions | Neck Rein | ||
| Barrel Racing | Trot Pattern | Walk Pattern | |||
| Barrel Racing | Lope Pattern | Trot Pattern | |||
| Barrel Racing | Gallop Pattern | Lope Pattern | |||
| Barrel Racing | Rate Barrels | Gallop Pattern | |||
| Barrel Racing | Gallop Pattern | ||||
| Cross Country | Key Hole | Canter High Jumps (Saddle Jumping) | |||
| Cross Country | Weldon's Wall | Canter High Jumps (Saddle Jumping) | |||
| Cross Country | Coffin | Canter High Jumps (Saddle Jumping) | |||
| Cross Country | Banks | Canter High Jumps (Saddle Jumping) | |||
| Cross Country | Sunken Road | Canter High Jumps (Saddle Jumping) | |||
| Cross Country | Normandy Bank | Canter High Jumps (Saddle Jumping) | |||
| Cross Country | Tiger Trap | Canter High Jumps (Saddle Jumping) | |||
| Cross Country | Chevron | Canter High Jumps (Saddle Jumping) | |||
| Cross Country | Corner | Canter High Jumps (Saddle Jumping) | |||
| Cross Country | Drop into Water | Canter High Jumps (Saddle Jumping) | |||
| Cutting | Flag Work | Transitions | Neck Rein | ||
| Cutting | Introduce Cows | Flag Work | |||
| Cutting | Trailing Cow | Introduce Cows | |||
| Cutting | Tracking Cow | Trailing Cow | |||
| Cutting | Work Single Cow | Tracking Cow | |||
| Cutting | Work Herd | Work Single Cow | |||
| Dressage | Vertical Flex | Transitions | |||
| Dressage | Lateral Flex | Transitions | |||
| Dressage | Shoulder In | Lateral Flex | |||
| Dressage | Collected Walk | Vertical Flex | |||
| Dressage | Collected Trot | Vertical Flex | |||
| Dressage | Lead Changes | Transitions | |||
| Dressage | Side Passing | Lateral Flex | |||
| Dressage | Free Walk | Transitions | |||
| Dressage | Halt | Transitions | |||
| Dressage | Working Canter | Transitions | |||
| Dressage | Medium Walk | Transitions | |||
| Dressage | Medium Trot | Transitions | |||
| Dressage | Medium Canter | Working Canter | |||
| Dressage | Rein Back | Halt | |||
| Dressage | Extended Walk | Transitions | |||
| Dressage | Extended Trot | Transitions | |||
| Dressage | Turn On Haunches | Medium Walk | |||
| Dressage | Travers | Lateral Flex | |||
| Dressage | Counter Canter | Lateral Flex | Collected Canter | ||
| Dressage | Renvers | Lateral Flex | |||
| Dressage | Flying Lead Changes | Lead Changes | |||
| Dressage | Half Passes | Side Passing | |||
| Dressage | Collected Canter | Vertical Flex | |||
| Dressage | Pirouettes | Turn On Haunches | Collected Canter | ||
| Dressage | Tempi Changes | Flying Lead Changes | |||
| Dressage | Passage | Collected Trot | |||
| Dressage | Piaffe | Passage | |||
| Endurance | Endurance Pacing | Transitions | |||
| Endurance | Hill Work | Transitions | |||
| Endurance | Rough Terrain | Transitions | |||
| Flat Racing | Introduce Gate | Transitions | |||
| Flat Racing | Break From Gate | Introduce Gate | |||
| Flat Racing | Work with Other Horse | Transitions | |||
| Gaited Pleasure | Improve Walk Form | Transitions | |||
| Gaited Pleasure | Improve Trot Form | Transitions | |||
| Gaited Pleasure | Work in Stretches | Improve Trot Form | |||
| Gaited Pleasure | Improve Canter Form | Transitions | |||
| Gaited Pleasure | Pace | Transitions | |||
| Gaited Pleasure | Amble | Transitions | |||
| In-Hand Jumping | Walk Poles | Stand | |||
| In-Hand Jumping | Trot Poles | Walk Poles | |||
| In-Hand Jumping | Trot Cross Rail | Trot Poles | |||
| In-Hand Jumping | Canter Cross Rail | Trot Cross Rail | |||
| In-Hand Jumping | Canter Low Jumps | Canter Cross Rail | |||
| In-Hand Jumping | Canter Med Jumps | Canter Low Jumps | |||
| In-Hand Jumping | Canter High Jumps | Canter Med Jumps | |||
| In-Hand Jumping | Introduce Course | Canter Low Jumps | |||
| In-Hand Jumping | Pacing | Canter Low Jumps | |||
| Pace Racing | Intro Hobbles | Practice Pulling Tire | |||
| Pace Racing | Intro Cart | Intro Hobbles | |||
| Pace Racing | Intro Gate | Intro Cart | |||
| Pace Racing | Break From Gate | Intro Gate | |||
| Pace Racing | Introduce Horses | Intro Cart | |||
| Pace Racing | Practice Passing | Introduce Horses | |||
| Pulling | Introduce Weight | Practice Pulling Tire | |||
| Reining | Sliding Stop | Transitions | Neck Rein | ||
| Reining | Spin | Transitions | Neck Rein | ||
| Reining | Large Circles | Transitions | Neck Rein | ||
| Reining | Small Circles | Transitions | Neck Rein | ||
| Saddleseat | Improve Walk Form | Transitions | |||
| Saddleseat | Improve Trot Form | Transitions | |||
| Saddleseat | Work in Stretches | Improve Trot Form | |||
| Saddleseat | Improve Canter Form | Transitions | |||
| Saddle Jumping | Walk Poles | Transitions | |||
| Saddle Jumping | Trot Poles | Walk Poles | |||
| Saddle Jumping | Trot Cross Rail | Trot Poles | |||
| Saddle Jumping | Canter Cross Rail | Trot Cross Rail | |||
| Saddle Jumping | Canter Low Jumps | Canter Cross Rail | |||
| Saddle Jumping | Canter Med Jumps | Canter Low Jumps | |||
| Saddle Jumping | Canter High Jumps | Canter Med Jumps | |||
| Saddle Jumping | Introduce Course | Canter Low Jumps | |||
| Saddle Jumping | Pacing | Canter Low Jumps | |||
| Trot Racing | Intro Hobbles | Practice Pulling Tire | |||
| Trot Racing | Intro Cart | Intro Hobbles | |||
| Trot Racing | Intro Gate | Intro Cart | |||
| Trot Racing | Break From Gate | Intro Gate | |||
| Trot Racing | Introduce Horses | Intro Cart | |||
| Trot Racing | Practice Passing | Introduce Horses | |||
| Marathon Driving | Introduce Cart | Practice Pulling Tire | |||
| Marathon Driving | Walk Trot Drive In Empty Arena | Introduce Cart | |||
| Marathon Driving | Drive on Roads | Walk Trot Drive In Empty Arena | |||
| Marathon Driving | Canter Drive in Empty Arena | Walk Trot Drive In Empty Arena | |||
| Marathon Driving | Drive Over Variable Terrain | Canter Drive in Empty Arena | |||
| Marathon Driving | Navigate Cones | Walk Trot Drive In Empty Arena | |||
| Marathon Driving | Navigate Tight Obstacles | Navigate Cones |
Bolded tasks indicate that the task must be 100% finished to meet the pre-requisite. Regular text indicates only 15% training is needed.
Note, if a training task is not listed here, then it has no prerequisites.
¶ How much training do I need to show a horse?
If you want to train your horse to show in a discipline, you will need to complete Groundwork training, Undersaddle or Basic Driving training, and then do at least some of the Discipline-specific training for whatever discipline you want to enter. Lower level shows don't expect horses to be completely trained though! See The Show System page for more information on how much, or little, training is expected for each level.
If you want to show only in conformation shows, then they only need to finish Groundwork training.
If you want to put your horse on a job, then most jobs also require some training. See the Jobs page for the specifics.
¶ Injuries
One last thing, horses can sustain injuries while training, and will need to take a break from training if they are injured. Some disciplines are higher-impact than others, and carry a higher risk for injury.